Have you ever found yourself staring at a bag of plain rice, wondering how to transform it into something spectacular? I certainly have! After years of experimenting in my kitchen, I’ve perfected what I believe is the ultimate comfort food: garlic butter rice. This humble side dish has become my family’s most requested recipe, and today, I’m thrilled to share all my secrets with you!
My Journey with Garlic Butter Rice
I still remember the first time I tried making garlic butter rice. It was during a busy weeknight when I needed something quick to accompany a simple protein. Little did I know that this improvised side dish would become a staple in my household!
The beauty of garlic butter rice lies in its simplicity. With just a handful of ingredients, you can create a dish that’s aromatic, flavorful, and incredibly satisfying. It’s my go-to recipe when I want to elevate a simple meal without spending hours in the kitchen.
Why You’ll Love This Recipe
Before we dive into the details, let me tell you why this garlic butter rice recipe has earned a permanent spot in my cooking repertoire:
- It transforms plain rice into something extraordinary
- Uses basic pantry ingredients you likely already have
- Can be customized based on what you have on hand
- Pairs beautifully with almost any main dish
- Takes minimal effort but delivers maximum flavor
- Makes excellent leftovers (if there are any!)
Essential Ingredients
Let’s talk about what you’ll need to make this magical dish. The beauty of this recipe is that while the core ingredients remain the same, you can easily adapt it based on what you have available.
Basic Ingredients
- Rice: I prefer long-grain white rice like basmati or jasmine for their fluffy texture and aromatic qualities. However, you can use any rice you have on hand.
- Butter: Unsalted butter is my preference as it allows me to control the saltiness. But if you only have salted butter, just reduce the amount of additional salt.
- Garlic: Fresh garlic cloves provide the most vibrant flavor, but garlic powder works in a pinch.
- Broth: I use chicken broth for richness, but vegetable broth makes this dish vegetarian-friendly.
- Salt and Pepper: The basics that enhance all the other flavors.
Optional Flavor Enhancers
- Fresh herbs (parsley, chives, thyme)
- Grated Parmesan cheese
- A squeeze of lemon juice
- Red pepper flakes for heat
- Finely diced onion
- Toasted nuts (pine nuts, almonds)
Ingredient Measurements Table
For those who prefer precision, here’s a detailed breakdown of quantities:
| Ingredient | For 2 Servings | For 4 Servings | For 8 Servings | Notes |
|---|---|---|---|---|
| Rice | 1 cup | 2 cups | 4 cups | Uncooked, long-grain white rice |
| Butter | 2 tablespoons | 4 tablespoons | 8 tablespoons | Unsalted, room temperature |
| Garlic | 2-3 cloves | 4-5 cloves | 8-10 cloves | Minced or finely chopped |
| Broth | 1 3/4 cups | 3 1/2 cups | 7 cups | Chicken or vegetable |
| Salt | 1/2 teaspoon | 1 teaspoon | 2 teaspoons | Adjust to taste |
| Black Pepper | 1/4 teaspoon | 1/2 teaspoon | 1 teaspoon | Freshly ground is best |
| Fresh Herbs | 1 tablespoon | 2 tablespoons | 4 tablespoons | Optional, chopped |
| Parmesan | 2 tablespoons | 1/4 cup | 1/2 cup | Optional, grated |
Equipment Needed
You don’t need fancy kitchen gadgets to make this recipe. Here’s what I use:
- Medium-sized pot with a tight-fitting lid
- Measuring cups and spoons
- Wooden spoon or spatula
- Sharp knife for mincing garlic
- Fine-mesh strainer for rinsing rice (optional but recommended)
Step-by-Step Cooking Instructions
Now, let’s get cooking! I’ll walk you through my foolproof method for perfect garlic butter rice every time.
Preparation Steps
- Rinse the rice (optional but recommended): Place your rice in a fine-mesh strainer and rinse under cold water until the water runs clear. This removes excess starch and helps achieve fluffier rice.
- Mince the garlic: Peel and finely mince the garlic cloves. The smaller the pieces, the more evenly the garlic flavor will distribute.
- Measure your ingredients: Having everything ready before you start cooking helps the process go smoothly.
Cooking Process
- Melt the butter: In a medium pot over medium heat, melt the butter until it begins to foam slightly.
- Sauté the garlic: Add the minced garlic to the melted butter and sauté for about 30-60 seconds, just until fragrant. Be careful not to let it brown or burn, as this will create a bitter taste.
- Add the rice: Add the rice to the pot and stir to coat each grain with the garlic butter. This helps prevent the rice from clumping and infuses it with flavor. Toast the rice for about 2 minutes, stirring frequently.
- Add the broth: Pour in the broth, along with salt and pepper. Stir once, then bring to a boil.
- Reduce and simmer: Once boiling, reduce the heat to low, cover with a tight-fitting lid, and simmer for about 15-18 minutes, or until the liquid is absorbed and the rice is tender.
- Let it rest: Remove from heat and let the covered pot sit for 5-10 minutes. This allows the rice to steam and become perfectly fluffy.
- Fluff and season: Uncover and fluff the rice gently with a fork. Taste and adjust seasonings if needed.
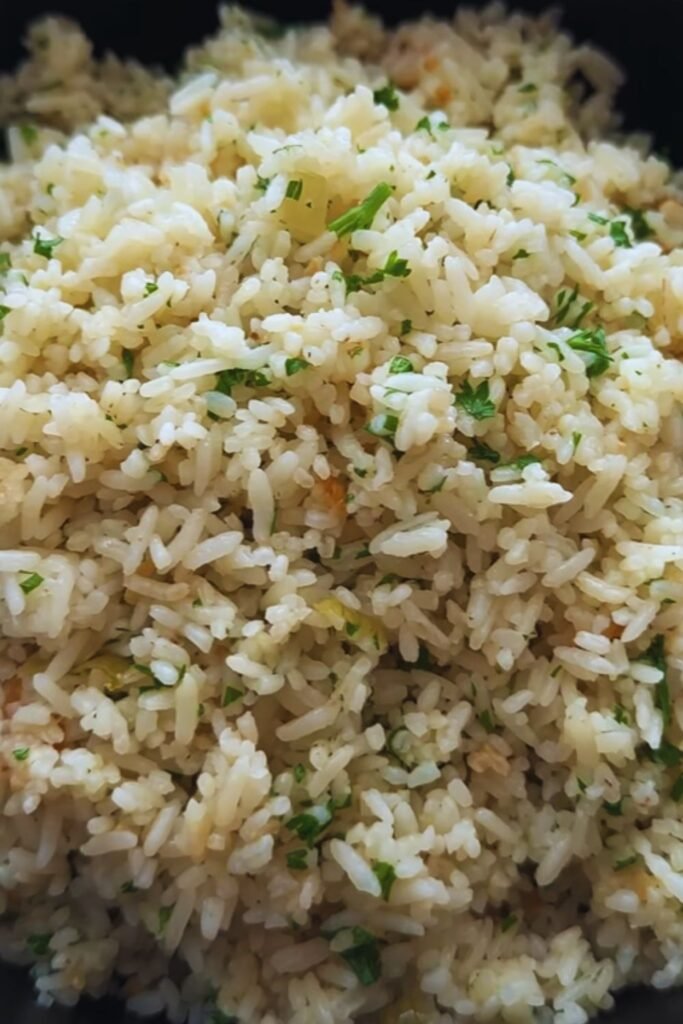
- Add finishing touches: If using, fold in fresh herbs, Parmesan cheese, or other optional ingredients.
Troubleshooting Common Issues
Even experienced cooks encounter challenges! Here are solutions to common problems you might face:
Rice is too hard or undercooked
- Cause: Not enough liquid or cooking time.
- Solution: Add 1/4 cup more broth or water, cover, and cook on low for an additional 5 minutes.
Rice is too soft or mushy
- Cause: Too much liquid or overcooking.
- Solution: Next time, reduce the liquid slightly. For the current batch, spread it on a baking sheet and bake at 300°F (150°C) for 5-10 minutes to help dry it out.
Garlic tastes burnt
- Cause: Heat too high or cooked too long before adding rice.
- Solution: Use lower heat and watch the garlic carefully. If you notice it beginning to brown too quickly, immediately add the rice to stop the cooking process.
Rice sticks to the bottom of the pot
- Cause: Heat too high or not enough stirring at the beginning.
- Solution: Make sure to coat the rice well with butter before adding liquid, and keep the heat at a gentle simmer.
Variations to Try
One of the reasons I love this recipe is its versatility. Here are some of my favorite variations:
Herb Garlic Butter Rice
Add 2-3 tablespoons of fresh herbs like parsley, chives, or basil at the end of cooking for a burst of freshness.
Lemon Garlic Butter Rice
Add the zest of one lemon while cooking and a squeeze of lemon juice just before serving for a bright, citrusy flavor.
Cheesy Garlic Butter Rice
Stir in 1/4 to 1/2 cup of grated Parmesan or another cheese of your choice after cooking for a rich, creamy texture.
Spicy Garlic Butter Rice
Add 1/4 to 1/2 teaspoon of red pepper flakes along with the garlic for a subtle heat throughout.
Mediterranean Garlic Butter Rice
Add 1/4 cup of sun-dried tomatoes (chopped) and 1/4 cup of olives during the last 5 minutes of cooking, then stir in some crumbled feta cheese before serving.
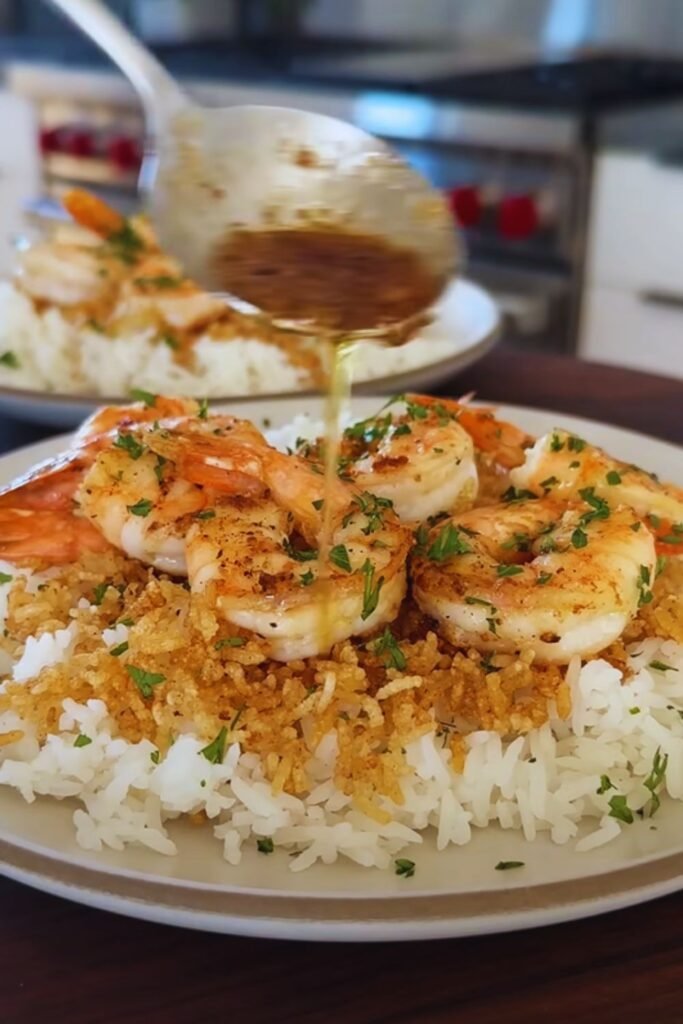
Serving Suggestions
Garlic butter rice pairs wonderfully with countless main dishes. Here are some of my favorite combinations:
- Grilled or roasted chicken
- Pan-seared fish or seafood
- Roasted vegetables
- Stir-fried tofu or tempeh
- Braised or slow-cooked meats
- Curries and stews
For a complete meal, I like to add a simple green salad or steamed vegetables on the side. The rice provides the perfect canvas for soaking up sauces and juices from your main dish.
Storing and Reheating Tips
If you’re lucky enough to have leftovers (a rare occurrence in my home!), here’s how to store and reheat them:
Storage
- Refrigerator: Store cooled rice in an airtight container for up to 3-4 days.
- Freezer: For longer storage, freeze in portion-sized containers for up to 3 months.
Reheating Methods
- Microwave: Place rice in a microwave-safe bowl with a splash of water or broth. Cover with a damp paper towel and heat in 30-second intervals, stirring between each, until hot.
- Stovetop: Add rice to a pan with a tablespoon of water or broth per cup of rice. Cover and heat on low, stirring occasionally, until heated through.
- Oven: Place rice in an oven-safe dish, add a tablespoon of water or broth, cover with foil, and heat at 300°F (150°C) for about 15 minutes.
Nutritional Information
For those watching their macros, here’s an approximate nutritional breakdown per serving (based on a 1/2 cup cooked serving using the basic recipe):
| Nutrient | Amount per Serving |
|---|---|
| Calories | 180-200 |
| Carbohydrates | 35-40g |
| Protein | 3-4g |
| Fat | 4-5g (from butter) |
| Fiber | 0-1g |
| Sodium | Varies based on broth and added salt |
Note: These values are estimates and may vary based on specific ingredients and portions.
Special Dietary Adaptations
This recipe is naturally:
- Nut-free
- Soy-free
- Egg-free
Here’s how to adapt it for other dietary needs:
Gluten-Free
- Ensure your broth is certified gluten-free (some contain additives with gluten)
Dairy-Free/Vegan
- Replace butter with olive oil, coconut oil, or a plant-based butter alternative
- Use vegetable broth instead of chicken broth
Low-Sodium
- Use unsalted butter and low-sodium or homemade broth
- Reduce or omit added salt, compensating with herbs and spices for flavor
Why This Recipe Works: The Science Behind It
As a cooking enthusiast, I find the science behind recipes fascinating. Here’s why this garlic butter rice works so well:
- Toasting the rice in butter: This step coats each grain with fat, which prevents them from sticking together. It also begins to break down the starch on the surface, resulting in fluffier rice.
- Sautéing the garlic in butter: Garlic contains oil-soluble flavor compounds that infuse beautifully into the butter. The gentle heat transforms raw garlic’s sharp bite into a mellow, aromatic flavor.
- Using broth instead of water: Broth adds depth through dissolved proteins, minerals, and flavor compounds that plain water lacks.
- The resting period: Allowing the rice to rest after cooking gives the starches time to set, creating the perfect texture.
My Personal Tips for Perfect Garlic Butter Rice
After making this recipe countless times, I’ve collected some wisdom to share:
- Don’t rush the process: Low and slow cooking is key to properly developed flavors and perfect texture.
- Quality ingredients matter: Since this recipe has few ingredients, using good-quality butter and fresh garlic makes a noticeable difference.
- Trust your senses: The aroma of perfectly toasted rice and sautéed garlic is unmistakable. Learn to recognize when each stage is complete.
- Make it your own: Once you master the basic recipe, don’t be afraid to experiment with add-ins and variations to suit your taste.
- Prep ahead: When hosting, I often prepare this up to the point of adding liquid, then finish cooking just before serving for maximum freshness.
Q&A Section
Q: Can I use brown rice for this recipe?
A: Absolutely! Brown rice works beautifully, but you’ll need to adjust the cooking time and liquid amount. Typically, brown rice requires about 45 minutes to cook and approximately 2 1/4 cups of liquid per cup of rice.
Q: Is there a way to reduce the butter without sacrificing flavor?
A: Yes! You can cut the butter in half and still get wonderful results. Alternatively, replace some of the butter with olive oil for a different but equally delicious flavor profile.
Q: My family doesn’t like visible pieces of garlic. Any suggestions?
A: You have a couple of options: 1) Use a microplane to grate the garlic into an almost paste-like consistency, 2) Infuse the butter with whole garlic cloves over low heat for about 10 minutes, then remove the cloves before adding the rice, or 3) Substitute with 1/2 teaspoon of garlic powder per 2 cloves of fresh garlic.
Q: Can I make this in a rice cooker or Instant Pot?
A: Definitely! For a rice cooker, sauté the garlic in butter separately, then add it along with the rice and liquid to your rice cooker and cook on the normal setting. For an Instant Pot, use the sauté function for the garlic and butter, add the rice and liquid, then cook on high pressure for 3 minutes with a 10-minute natural release.
Q: How can I make a large batch for a potluck or family gathering?
A: This recipe scales up beautifully. Use the measurements provided in the ingredient table for 8 servings, and consider cooking it in a large, wide pot to ensure even cooking. You might need to increase the cooking time slightly for very large batches.
Q: I accidentally added too much salt. How can I fix it?
A: If your rice is too salty, cook another small batch without salt and mix them together. Alternatively, serve it with unseasoned main dishes and vegetables to balance the overall salt content of the meal.
Conclusion: Why Garlic Butter Rice Deserves a Place at Your Table
After sharing this recipe with countless friends and family members, I’ve come to realize why it’s so beloved. This dish strikes the perfect balance between simplicity and sophistication – it’s easy enough for beginners but delicious enough to impress guests.
The humble combination of fragrant rice, aromatic garlic, and rich butter creates something far greater than the sum of its parts. It’s comforting, versatile, and utterly satisfying – the kind of side dish that sometimes steals the spotlight from the main course!
Whether you’re a seasoned cook or just starting your culinary journey, I hope you’ll give this garlic butter rice a try. Make it once, and I’m confident it will become a regular feature in your kitchen, just as it has in mine.
Remember, cooking is ultimately about nourishing yourself and those you care about. So take this recipe, make it your own, and enjoy the process as much as the delicious results!